Creating Accounts in AWS Orgs

In the common course of AWS usage, you'll often find yourself spinning up a new account for each workload you do - per AWS Best Practices Documentation you'll find yourself needing new accounts often.
One good thing is that this is relatively easy to do! Although there are multiple ways to do it in IaC, we're going to use Terraform.
Skip to the Repo, Marty!
Okay, here you go. This repo is what we'll use to create a brand new, ephemeral account.
 martyjhenderson
Okay, so, if you pull that down, let's talk about what the pieces do, shall we?
New Account
In new_account.tf you'll find the main engine behind this.
resource "aws_organizations_account" "account" {
  name              = var.new_account_name
  email             = var.account_email
  close_on_deletion = var.delete_account
  parent_id         = var.parent_ou
}
This references four variables - new_account_name , account_email , delete_account , and parent_id and uses them to create the new account.
You also will note that close_on_deleteion can set to true here (through a variable). There's many warnings in the Registry about what this does, but for my example, I am building ephemeral accounts. These accounts are great for things such as Sandboxes or testing things. What happens is when the terraform destroy function is ran against this code, it'll destroy the account. (If you leave it to true or don't assign anything, it'll orphan the account from your organization, if it can)
Name and email are pretty straight forward - this is the email assigned to the root of the account and the name of the account in the list. These are important things to note for setting up root credentials on an account!
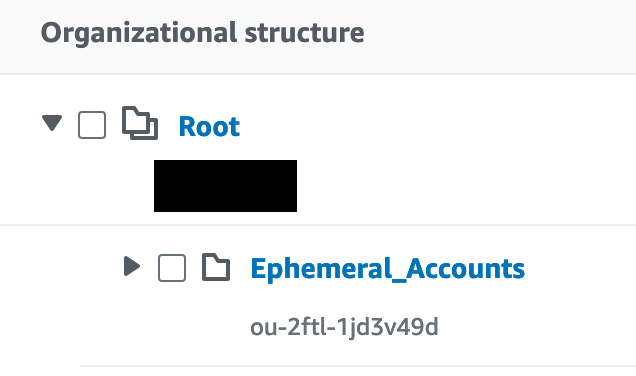
However, the odd one out here is parent_id. This is the ID of an OU in your account that you are assigning the account to. This means that it'll immediately have SCPs applied and you won't have to worry about manually linking your rules and policies to it. You can find the OU ID, manually, in your AWS Organization account.
Setting your variables
Because the variables are defined as variables in the other Terraform files, you will need to defined a tfvars type file - of which there is an example in prod.tfvars in the repository. Here you simply apply what you want you want the variables to be. We'll come back to this file when we deploy. You can also name the file whatever you want - call it peanutbutter.tfvars if you really want. Just remember what you named it!
The Backend
Every time Terraform is ran, it stores it's state somewhere. If you don't define it, it will store it on the local machine from which it is ran. In this one, we're defining an S3 bucket location and the dynamo table to store the key in (Pro Tip: make sure your DynamoDB table uses LockID as the index for it to work with Terraform).
More than likely, if you're running this at an organization, they have a backend policy defined somewhere and you will need to, instead, use that. In that case, you can delete or replace backend.tf with whatever is appropriate. If you don't have a backend setup, I encourage you to setup a bucket and a dynamodb table and update that backend.tf appropriately.
A side note: Credentials
For this example, you would need to have your Organization Root Account's credentials. I highly, highly encourage you don't just grab a user/keys and assign policies to do this. The most common way to do is safely is through OIDC, which you can do with things like GitHub Actions, Bitbucket Pipelines, and GitLab. Please, please don't throw around your root credentials randomly. Be sure to rotate them regularly, use SSO if you have to have them locally, and leverage secure methods.
Fire it off!
You'll need to do your standard things - terraform init and make sure your backend validates (note, you'll need AWS creds that can see that backend. If you're running local, be sure to set AWS_PROFILE appropriately.)
Then run your terraform plan except be sure to reference your variables file! The full command should look like terraform plan -var-file=prod.tfvars (or whatever you named your tfvars file). If you get a prompt asking for the variable definitions, you either forgot to define a variable or you didn't reference the file.
Your plan should look something like this
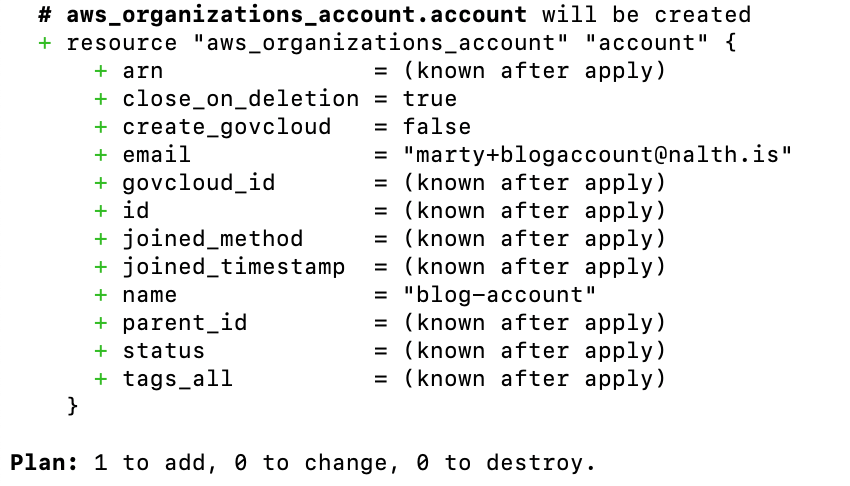
This 1 to add shows you're going to add your account to your root organization. Woo!
Time to fire it off - run terraform apply -var-file=prod.tfvars
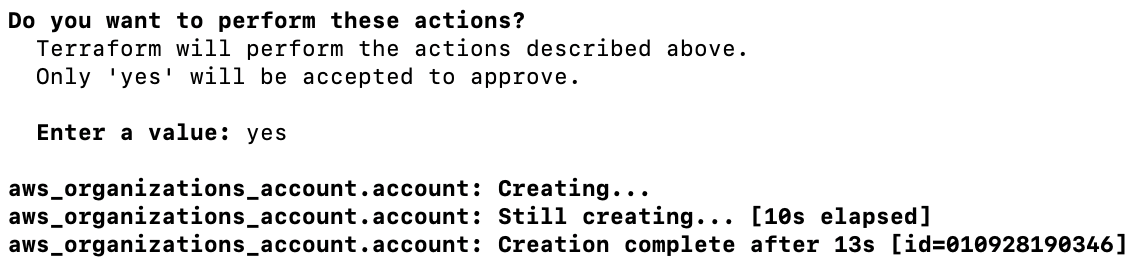
(If you don't want to type yes you can set -auto-approve=true but be careful with that flag!)
And tada! You have a new account in the OU you picked

If you want to get rid of it, just be sure to run terraform plan -destroy -var-file=prod.tfvars and terraform apply -destroy -var-file=prod.tfvars. There you go, ephemeral account gone!
Conclusion
Leveraging a new account for POCs and new workloads is common practice, but there's not reason to not automate it! You can even use this to leverage automating VPCs and other connections into your account with other pieces referencing your account number (and a healthy use of depends_on).
Go forth! Create all the accounts you need to minimize blast radius and maximize building!